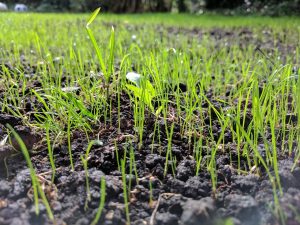
We are well into the bedding season with garden centres and nurseries offering a variety of plants to give a colourful display. To ensure they keep looking great all summer long feeding is essential as Dave Gillam, general manager at Abercorn Garden Centre in Essex explained to Ken Crowther.
I hope that all are well rested and have enjoyed this summer and have had a chance to get away and relax? However, as you all know the garden is a demanding beast and I’m afraid won’t stop for anyone! This summer has seen some rather hot and balmy days and also the odd thunder storm, playing havoc with watering duties. Only just the other day I was watering tubs and containers in the rain! It just wasn’t enough to rely on mother nature; I had to boost the supplies. That aside, other than watering and liquid feeding on a regular basis, there are just a few other jobs that shouldn’t be left too long.
This is the perfect time to look through the myriad of seed and bulb catalogues streaming through the post for colour ideas this autumn and importantly early next year. Don’t just look out for decorative interest, which is important, but sometimes so is disease resistance especially for any edibles. With perennials I’m also looking for those plants that are self-supporting – I just don’t want to deal with link stakes or canes everywhere.
One of the things I love to do is grow on lilies in pots and secrete them in the bed and borders as a form of successional bedding. They’re ideal for giving height, instant colour and scent by the bucket load, however, once blooms have faded, they need to be removed and popped at the back of the garden to die down naturally; don’t forget to water though and feed to enrich the bulb for next years display.
Unfortunately you now have gaps…what’s to do? Why not plant up slightly taller pots with perennials such as Rudbeckia, Echinacea and or varieties of grasses. All of these flower well, but also improve with age…don’t we all!
Rudbeckia and Echinacea have fab flowers, but have even better autumn and winter colour with their superb deep black seed heads – very striking. Grasses, on the other hand, produce flowers that are almost everlasting plus have foliage that colours well as it ages (they don’t need to be cut down until February next year). Doing this will extend the season of interest and keep your garden a talking point with friends and family.
Start to collect seed from plants. Recently I collected spent flower stalks of Aquilegia vulgaris (columbine). Harvest them carefully, because as soon as you touch the stems the seed falls. Cut flower stems down to the base of plant or to an outward facing leaf and turn carefully into a large paper bag… and let nature take its own course. Once seed has dropped sieve to separate any coatings etc from the seed. Once complete seed can be stored in a clean envelope, labelled and dated, and stored in a frost free dry place. Believe it or not I use the fridge, as long as its around 5°C (41°F), as this will ensure that viability is retained for as long as possible. Use as and when required. Aquilegia can be sown fresh in seed trays and left in cold frames or kept away from over exposed areas. Sometimes they germinate early, if so keep them moist, NOT saturated, and allow them to grow on for at least ½ year. This will enable a more stocky plant to develop. Pot up and grow on for another ½ year before setting out into the ground. Failing this you can also sow in February. Plants will be ready to be move on early/ late summer.
Check out this RHS link to collecting, storing and sowing a range of seed https://www.rhs.org.uk/advice/profile?pid=675
I can’t believe it another year has gone by and we have started another academic year at Writtle University College – notice the name change?
Check out the college web site for a full update www.writtle.ac.uk
If you’re looking to update your knowledge and skills or wishing to pursue a career in horticulture give the team a call on 01245 424200. Alternatively, come and chat with us anytime. Check out this link for further details http://writtle.ac.uk/Information-Events
Good luck and happy gardening!
For any gardening tips why not contact Tom Cole, Senior Horticultural Lecturer, Writtle College, Chelmsford, CM1 3RR by post (including a SAE) or by email at tom.cole@writtle.ac.uk
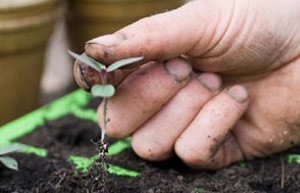
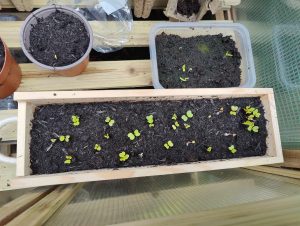
If so it’s time to move them on to bigger and better things. Once container-grown seedlings have germinated, it is usually necessary to prick them out. This involves teasing out the seedlings and transferring them to a new container.
Why is pricking out necessary?
If seedlings are left to grow on in crowded conditions, they become drawn, with small leaves and long spindly stems and will never grow into good quality, sturdy plants. Pricking out will give seedlings more light, space and air making them less prone to fungal diseases. At Writtle College most courses have been undertaking this task in readiness for summer bedding borders, vegetable plots and or trees and shrubs that were sown late last year.
The seedlings are transferred from a seed sowing compost to potting compost, which contains a higher level of nutrients than seed compost. Use a multi-purpose or a specific compost suitable for the plants you are growing on.
Broadcast seedlings may germinate erratically so that a range of sizes can be seen in the seed tray. They can be graded during pricking out so that growth is more even. Next time to avoid this try out modular trays – these contain cells of compost for individual seeds so there is no competition for water or nutrition. As a result they can be left to grow for longer before moving to the next size pot.
Seedlings are spaced out so that they grow at a uniform rate. This should mean that all the plants will be ready at the same time.
When should pricking out be done?
Basically as soon as possible! The seedling should have leaves that are large enough to handle and a simple, single, short root that will not be damaged by transplanting. Another indicator is when seed leaves are touching.
Working area
Pricking-out should be undertaken either in a purpose-built, clean pricking-off shed or in the glasshouse beside the area where the containers of pricked-out seedlings are stood down. I haven’t any of these so I have ‘borrowed’ the dining room table and often use the draining board much to the consternation of my partner!
Gather all the necessary equipment and organise the workspace so it is both comfortable and efficient.
Equipment
Choose a suitable potting compost such as loam-less potting compost (peat or coir potting compost) or J I No. 1 potting compost. Never re-use potting compost for fear of disease.
Containers used range from seed trays to modular trays or pots depending on the seedling. Today seed trays are less popular and modular trays are more common. Containers must be clean to prevent the spread of fungal disease.
A striking off board is used to remove excess compost and boards that mark the pricking out stations are sometimes useful. They may be bought but maybe made with two pieces of wood and nails spaced at regular intervals.
A dibber (a length of bamboo cane or a proprietary one) is used to tease out the seedlings.
Method
Prepare the container by filling with compost and strike off the excess. Modular trays should be tapped to settle the compost.
If pricking out into a tray an adapted striking off board may be used to mark out the planting stations.
Prepare the seedlings by watering in advance to ensure the compost is moist when you come to prick out the seedlings. Ideally the seedlings should not be wet when you prick them out as this will make them more susceptible to damage.
Tap the tray of seedlings to loosen them from the sides.
Prick out the seedlings by:
- Loosen the compost with your dibber and holding the seedling by the leaf gently tease it out of the compost
- Make a hole in the compost using your dibber and insert the seedling into the hole. Gently firm the compost around the seedling
Remember – never pick up a seedling by the stem, as this will cause damage. Always pick up seedlings by the leaf using your thumb and forefinger. Do not delay inserting the seedling into the compost as they dry out very quickly.
Most seedlings are pricked out individually but some seedlings such as Alyssum and Lobelia are pricked out in clumps of up to five seedlings.
Gently firm the compost around the seedling. The seed leaves should sit just above the compost – if the seedling is left very tall it will not produce a sturdy plant.
Water the seedlings in, place the container in a warm environment to grow on (18– 20 °C), and protect from strong sunlight.
Keep a careful eye on watering and check regularly for pests and diseases.
Hardening off
Reduce the growing on temperature and eventually move the seedlings outside to covered cold frames. Increase the ventilation during the day and eventually leave the lights (wooden framed glass panes used to cover cold frames) off at night. Protect the seedlings by covering the lights with straw or newspaper should frost be forecast.
Good luck and happy gardening!
For any gardening tips why not contact Tom Cole, Senior Horticultural Lecturer, Writtle College, Chelmsford, CM1 3RR by post (including a SAE) or by email at tom.cole@writtle.ac.uk
It’s the time of year when gardeners fill their gardens with bedding plants. To keep them looking great all summer Dave Gillam from Abercorn Garden Centre and Ken Crowther have some handy hints and tips on the best ways to ensure the plants stay looking fabulous for many months.
Chris Collins from Thompson & Morgan talks to Ken Crowther about bedding plants. Peter Freeman explains how they ensure the plants go out to customers in the best possible condition and Michael Perry looks ahead to the Chelsea Flower Show.